Tag Archives: Bentosh

Winter Chicken Bentosh

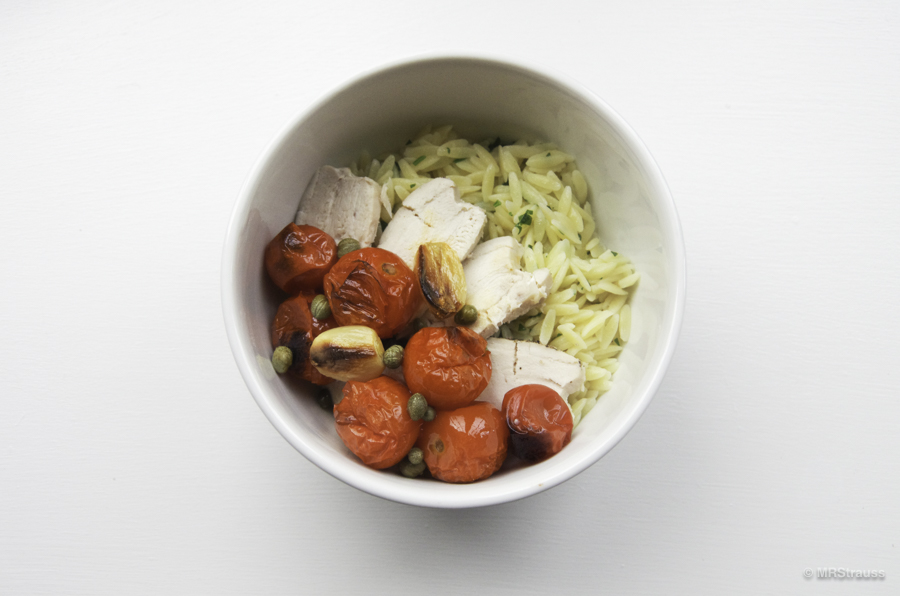
Possibly not for the dedicated locavore, but I found this a good way to bring tomatoes to the table in winter— as the little ones taste the same to me in any season. This is a light, cheery, and to me, easy to make warming winter meal.

Arrange the shelves in the oven to make room for the baking dish with the chicken and the baking pan with the tomatoes to go in together— I put the chicken just below the middle and the tomatoes and garlic just above the middle. Get the oven going at 400°. Put as many cherry tomatoes and peeled garlic cloves as you want in a bowl. Toss with a little good-tasting olive oil, spread this out on a baking sheet and sprinkle with some sea salt flakes. Place the chicken breasts in a baking dish and sprinkle with salt and fresh cracked pepper. If the baking dish doesn’t have a lid, cover with foil; I use an 11 cup Anchor Hocking baking dish with a glass lid which is good for up to four not too big chicken breasts. Put everything in the oven and pour yourself a glass of something. The tomatoes will take around 30 minutes to shrivel up and get some brown spots. I usually just leave the chicken in until everything is done, but you can test it around 20 minutes; if it looks cooked through when you pierce it with a knife or the instant read thermometer says it’s 165º, it’s done. You can take it out and let stay warm on the stove.

While you’re sipping and the tomatoes are roasting, start a pot for your orzo and bring it to a boil; salt the water if you wish. Orzo usually takes 10 minutes, so try to plot for it to be done when the chicken and tomatoes come out. While you’re waiting, finely chop some parsley for the orzo, drain a few spoonfuls of capers, and have some lemon wedges ready— I take out any pips that I can see. Oh, and you can set your bowls on the stove to let them warm up a bit.

When the tomatoes and garlic are shriveled up and brown in spots, it’s ready. Drain the orzo and put it back in the pot; drizzle with some olive oil and fold in the parsley and maybe some salt. Take the chicken and tomatoes out of the oven and slice or dice the chicken in the baking dish or on a cutting board. Now it comes together: every bowl gets some orzo, a few slices of chicken, tomatoes and garlic. Then I finish the dish with a few capers and a splash of lemon juice, but it tastes just as good without— the roasted tomatoes are the star of the show here. This might work with fish, maybe tilapia dredged and pan fried. The orzo could be any small pasta (little shells with fish could be nice) or even rice, quinoa, or couscous.

For this four person version, you’ll need:
• Four small chicken breasts (I find that the organic, air-chilled ones are the most tender)
• Two pints of cherry tomatoes
• One or two heads of garlic
• Two cups of orzo
• One cup of parsley leaves (I don’t like the stems, so I pluck the leaves)
• One lemon
• Two tablespoons of capers
• Salt, ground pepper, olive oil
Optional: sea salt flakes, fresh cracked pepper

Cooking equipment I used:
• Anchor Hocking 11 cup covered baking dish or 9×13 baking dish with foil to cover
• 13×18 sheet pan for the tomatoes and garlic
• Three quart or larger saucepan for the orzo

Notes:
For olive oil, I use Columela— it has a sort of spicy flavor, for sea salt flakes, I use Maldon, and for pepper, I use the Tellicherry variety. I use table salt for anything mixed in or cooked and save the sea salt flakes for finishing or roasting. Using these ingredients adds a little extra flavor to the dish and they’re getting much easier to find now. I’m wondering about the salt packed capers I see popping up, but they are super expensive. I guess I should try them. This dish could also work with quinoa or maybe even white rice.

Update February 2016: I made this with quinoa instead of orzo and I like it just a much.

Copyright © 2015 MRStrauss • All rights reserved

Summer Sole Bentosh

Sole

I love how bright tasting this is. I’ve made it with both orzo and quinoa and both are equally good. I was originally going to make this with tilapia but decided to get sole instead. This turned out to be a good thing. The sole is so thin, I decided to roll it up and that worked really well here. Although there is some preparation involved with the vegetables, overall the dish keeps the simplicity I was looking for.

Get the oven going at 400°. Rinse and dry the sole. On a baking sheet with parchment paper if needed, brush the fish with olive oil and sprinkle with fresh cracked pepper and sea salt flakes; then roll the fish and repeat with olive oil, salt, and pepper. Place in the oven when everything else seven or so minutes from finishing. You can top the fish with some toasted panko at the end if you like some crunch. Actually, it’s your fish, so you can put whatever you want on it. I have a nut allergy so I can’t tell you if chopped nuts are a possibility here.

Get a pot of water going for the orzo or prepare quinoa or couscous according to how you like to make it. Then work on the sauce so it can have a little time for the flavors to come together. In a food processor or with a mortar and pestle or on the cutting board: about two cups of parsley with lemon zest, lemon juice, olive oil, salt, and garlic— to the taste and quantity you want. I use the zest and juice of one lemon to be economical and as many a four cloves of garlic because I love garlic. I wonder if basil would work instead of the parsley; I think I’ll try that try that now that my basil plants are getting too big. I may also try adding some tarragon with the parsley.

Then set to work on your vegetables. I like carrots, broccoli, and yellow squash. I cut the carrots and squash into thin half-moons and the broccoli into small half-crowns (you can save the stems for slaw). Then saute in a little olive oil, salt, adding a clove or two or four of crushed garlic at the end. I put the carrots in first for a minute or so, then the broccoli, and then the squash. You could also boil the vegetables in with the orzo by adding the carrots the last four minutes and the broccoli and squash for the last three to two depending on the thickness. I also want to try adding some red pepper; maybe taking out the carrots or the squash. If there’s still some asparagus around, that would be good here too. Lots of things could be really good here. Once the orzo is in and the vegetables are sauteing, the fish can have its turn. The fish is ready when an instant read thermometer says 145º or when a fork or knife can easily go through the thickest part. Do I need to say ‘drain the orzo’?

Then it all comes together in a filling little bowl. I’m thinking next time I’ll give the finished bowls an extra splash of lemon and dash of sea salt flakes before it hits the table.

For this four person version, you’ll need:
• Two medium or one large filet of sole for each person (cut large ones in half)
• Two cups of orzo
• Two crowns of broccoli
• Three carrots
• One or two yellow squash (depending on size)
• Garlic (two to four cloves or more for the vegetables and sauce )
• One lemon
• Two cups of parsley leaves (I don’t like the stems, so I pluck the leaves)
• Salt, ground pepper, olive oil
Optional: sea salt flakes, fresh cracked pepper

Equipment I used:
• Frying pan for vegetables (I used a 12″ pan)
• 13×18 sheet pan lined with parchment for the fish
• Three quart or larger saucepan for the orzo

Notes:
For olive oil, I use Columela— it has a sort of spicy flavor, for sea salt flakes, I use Maldon, and for pepper, I use the Tellicherry variety. I use table salt for anything mixed in or cooked and save the sea salt flakes for finishing or roasting. Using these ingredients adds a little extra flavor to the dish and they’re getting much easier to find now.

Update September 2015: I also like Nuñez de Prado, another ‘spicy’ olive oil. I also made this with tilapia, but I wasn’t crazy about it. I’m sure there are other mild white fish that will work here, so I’ll keep an eye out. I also want to try couscous as the base.

Copyright © 2014 MRStrauss • All rights reserved

Spring Salmon Bentosh

Better Salmon (1 of 1)

The only part of this recipe where measure matters is for the rice and even there I have not found the need to be too precise. Perfect rice is perfect for you: add more water, less water, more salt, oil, a bay leaf, a chopped onion. In time, you’ll have a lot of perfect rice. I like baked brown rice— it comes out with a little more bite left to it. This also works well if you are roasting the asparagus since you can make double use of the heat your oven worked hard to get. Everything else is subject to the whims of whoever is making it. I do try to make extra rice since it is so useful for so many things— even plain for a quick snack. But sometimes everyone is really hungry and the only thing left is a small prize of rice scrapings for whoever is cleaning the dishes. You could also make this with quinoa, couscous, or some sort of small pasta.

If I am using medium to thick asparagus, I roast them. These seem to really like being roasted and will thank you with a smoky sweet flavor. I cut them into bite-size pieces, discarding any hard ends, toss them with olive oil and flaked sea salt and spread them out on a baking sheet in a single layer, giving them a little space. If I have the thin asparagus, I trim their woody ends,  leave them whole and drop them into boiling, salted water for two minutes at most and then run them under a bit of cold water and onto a kitchen towel. Then they would be strong enough to merrily jut out of the bowl and you could eat them by hand, dipping them in the sauce as you go. It’s always fun to use your fingers.

I have been seeking out wild Sockeye, King, or Coho salmon because they have the deepest color. I’m not sure what goes on with farmed salmon, but they look like I do after a long winter—pale. Some even have natural color added. Something added is never natural. What color was it before? I would rather have a smaller piece of a salmon that lived the salmon life. And here you don’t need a big piece.

Start with the baked brown rice. Make sure there is room in the oven for the rice (I bake this in a 11 cup square covered Anchor Hocking baking dish) and the baking sheet of asparagus. Get the oven going at 375°. This is my big, hoping for leftovers portion, but you can cut it in half or thirds: 2 1/4 cups medium grain brown rice, 3/4 teaspoon table salt, 3 1/3 cups water, 2 tablespoons of olive oil, 9 x 13 glass baking dish with foil to cover or a similar capacity glass baking dish with a glass lid. This will spare the foil. Bring water to a boil in a pot or microwave in a four cup Pyrex measuring cup or other microwave safe bowl. In baking dish combine rice and salt. When water is boiling, add it to the rice. Stir in the olive oil and cover. Bake for about an hour. Put the bowls on the stove to warm up.

Once the rice is in, cut up the asparagus. I usually cut them on the bias just because I like the way they look and it doesn’t take any more time here. Discard (or compost) any really woody ends. Toss with a little olive oil and flaked sea salt. Spread on a baking sheet and put them in the oven with the rice for the last half hour. When you take the rice out, move them up to the top rack and broil for a few minutes to get some nice brown spots going.

After the asparagus goes in, make the sauce. Mix the greek yogurt or any plain yogurt you like or have around, or even mayonnaise, with a handfuls of fresh minced chives and parsley. You can also try adding mint. Or maybe some tarragon could work. Squeeze in enough lemon juice to get the taste and consistency you like and add a dash of salt and a little fresh ground pepper. Set it aside to let the flavor come together.

When the rice is about ten or so minutes from done, set a pan or a griddle on the stove and let it get good and hot. Prepare your salmon: rinse, dry, remove any bones, season with a little table salt and ground or fresh cracked pepper. Sear the flesh side first, turning after it releases from the pan and has a little crust to it. I don’t find that I need any oil here, I just have to wait for the pan to let it go after a few minutes. Sear the other side a few minutes and let the skin crisp up, someone at the table will probably love a side dish of crispy salmon skins. Turn the heat down and let it finish cooking, anywhere from 3 to 5 minutes or so depending on how thick it is and how done you want it to be. While the salmon is finishing, remove the rice from the oven, move the asparagus to the top shelf and set the oven on broil. Is the salmon done? Sneak a peek with a sharp knife if you’re not sure. I always do this because I’m never sure. Or better yet— see if an instant read thermometer registers 145º.

It’s ready. Remove the skins from the salmon if you want. Or leave them on. Assemble your little bowl with as much or as little as you want. Top with a few chive batons if you’re in the mood.

Why a bowl? You can use any kind of dish, but I like a bowl. I like to cup my hand around the bowl while I’m eating to share a little of the food’s warmth with my hands. The best part is at the end: holding the bowl helps you get every last bit out.

For this four person version, you’ll need:
• A pound of salmon cut into four filets (I like wild Sockeye, King, or Coho best)
• Three cups of medium grain brown rice
• Two bunches of asparagus
• Plain Greek yogurt (small 5.3 oz.)
• Around a quarter to a third cup each of finely chopped chives and parsley
• One lemon
• Salt, ground pepper, olive or canola oil
Optional: sea salt flakes, fresh cracked pepper

Equipment I used:
• Frying pan for salmon (I used a 12″ pan for four pieces of salmon)
• 13×18 sheet pan for the asparagus
• Anchor Hocking 11 cup covered baking dish (or 9×13 baking dish with foil to cover for the rice)
• Four cup Pyrex measuring cup for boiling water (or pot or something else to boil water)

Notes:
For olive oil, I use Columela— it has a sort of spicy flavor, for sea salt flakes, I use Maldon, and for pepper, I use the Tellicherry variety. I use table salt for anything mixed in or cooked and save the sea salt flakes for finishing or roasting. Using these ingredients adds a little extra flavor to the dish and they’re getting much easier to find now.

Copyright © 2014 MRStrauss • All rights reserved